【ios】 framework分离与合并多种CPU架构

Tags

, ,

如果你所用的framework支持真机和模拟器多种CPU架构,而你需要的是其中的一种或几种,那么可以可以从framework中分离出各种架构,然后合并你需要的,具体的方式举例如下:

首先从framework中分离出armv7 arm64,或者还有armv7s
lipo XXXX.framework/XXXX -thin arm64 -output XXXX.framework/XXXX-arm64
lipo XXXX.framework/XXXX -thin armv7 -output XXXX.framework/XXXX-armv7
然后合并分离出的两种架构
lipo -create XXXX.framework/XXXX-armv7 XXXX.framework/XXXX-arm64 -output XXXX.framework/XXXX
注:查询framework支持哪些架构,命令为:
lipo -info XXXX.framework/XXXX
如此便去掉了i386和x86_64的支持
NOTES: if you cannot add run script phase in your cloud compilation environment, this is the right way to deal with SDK with simulator symbols.

Configuring the Gigaset A510/A540 IP for SIP Registration

Tags

, ,


This guide shows you the steps to configure a SIP phone to register with Twilio. If you have any feedback, please feel free to leave comments here.

Here’s the steps you can follow up to set it up on your end. The main reference is from this link,
Please follow this first, and I will just highlight the points you may need to pay attention to.
1. Register your SIP Endpoint
 Please make sure include us1 in the domain,
{domain-name}.sip.us1.twilio.com – (North America Virginia)
2. Launch the sample webapp to Heroku
You can deploy your own Webapp for free in under 5 minutes that let’s your SIP Endpoint call the Public Telephone Network. If you don’t have one already you can sign up for a free Heroku account.
Click and deploy, that’s it.
3. Receiving calls on your registered SIP Endpoint
Create a TwiML Bin here with the following content,
    <Response>
        <Dial>
            <Sip>
                yourusername@yoursipdomain.sip.us1.twilio.com
            </Sip>
        </Dial>
    </Response>
Note: yourusername in the previous TwiML example MUST match one of the usernames specified in your Console’s SIP Registration Credential Lists.
Note that if you have multiple SIP Endpoints registered under the same AOR, so please register one AOR for each Phone/restaurant, then all devices will ring simultaneously. See Limits.
4. Configure Gigaset A540 IP
Detailed configurations are attached as screen shots.
Few things to highlight,
Under Connections, make sure Authentication name, Authentication password and Username is the same name with your credential configured in twilio.com; Select Network Protocol, select TCP only
Under Audio tap, leave G.711 u law and G.729 there
For Advanced VoIP Settings, choose DTMF as RFC 2833.
The details are attached here from the few screen shots.

This slideshow requires JavaScript.

投资界的FA(财务顾问) or 拉皮条?

(文章来源于:鸡窝在线天使投行)

FA在投资界,其意思为财务顾问,英语Financial Advisor的 缩写,别名”新型投资银行“,其核心作用是为企业融资提供第三方的专业服务。财务顾问在企业融资和发展的过程中,起到了举足轻重的作用。像京东、聚美优品都成长过程中,基本都有专业化的FA在服务。FA绝对不是到处发小广告一样的拉皮条,真正靠谱的FA甚至要比投资经理更懂得投资。

客观来说,财务顾问在国内资本行业中的口碑一般,这个游走于投资者与企业之间的群体的天然使命应当为消除交易双方信息不对称,像有人说过“其实自己没钱,但是因为他们的专业性,认识的VC、PE和投行的人多,他们帮助你从外面找钱,从这一点来说有点像拉皮条的”。


但是,真正靠谱的FA,还是需要两把刷子的。

FA 的价值

专业的FA可以提供有针对性的服务。FA了解主流投资机构的口味与风格,可以实现最优匹配;以自身的信誉做背书,企业能够接触到投资机构决策层;引荐几家不同的投资机构,有利于交易条件谈判;同时,以FA出面来撮合交易,可以在很大程度上避免销售过度(Overshopped)的形象,有利于融资成功。

· 帮你梳理融资的故事

1)分析市场上有哪些可比项目有哪些,现在都是什么阶段了;

2)发觉、提炼项目的优势,同时用投资人的语言更好的表现出来。

3) 为项目融资规划提出专业化的建议,比如何时融资应该何时,第一轮对二轮融资多少合适,估值该定多少。

· 帮你对接合适的投资人

1) 介绍最可能理解你的机构和机构里面合适的项目经理,减少鸡同鸭讲的概率;

2)作为第三方斡旋,促进沟通。

· 帮你从头至尾协调从协议到交割的所有流程

1) 作为一名知心姐姐在你在屡战屡败的投资人哪里,舒缓你的情绪,给予信心;

2)对投资合同谈判提出专业化的建议。

啥为伪FA

对投资行业缺少基本的认识,不了解投资人的工作方式和偏好。接到项目后就满大街的散发。如果发现你的BP在各种群、论坛里流传,就要小心遇到伪FA咯。 你想想,大街上叫唤的卖奢侈品的你会信吗?

收取高额的前期费用。业界专业的FA是后期收费的, 帮你融资前不会收取费用的,因为在接单的时候,他就有很大把握可以融到资了。当然,专业的FA,对项目也会有严格的尽调,把握很小的项目不轻易接。可想而知,如果你作为FA推给投资人的都是那些所谓世界独一无二的项目,长了投资人还会看你的邮件吗?

如何鉴别真假FA

其实很简单问几个问题就了解了:

1、让他列出前50强哪些机构不会看我们的项目(前50强机构对投资阶段、投资行业还是有比较大的区分,里面有多家细分行业和阶段的)

2、从可能对我们感兴趣的机构中,随机挑选两家,让他给你分析下内部随会适合看我们的项目。然后让他给你看看他与这个机构的人是否有日常的联系和沟通。

尤其是对于首次融资的创业者们,鉴别这些不靠谱的FA的最佳方式,就是在投资人提出要对你DD之前,先跟其他投资圈里的人、他所服务过的公司DD一下你眼前的投资人。

WebRTC手记之本地视频采集

Tags

转载请注明出处:http://www.cnblogs.com/fangkm/p/4374610.html 

前面两篇文章介绍WebRTC的运行流程和使用框架接口,接下来就开始分析本地音视频的采集流程。由于篇幅较大,视频采集和音频采集分成两篇博文,这里先分析视频采集流程。分析的时候先分析WebRTC原生的视频采集流程,再捎带提一下Chromium对WebRTC视频采集的适配,这样能更好地理解WebRTC的接口设计。

1. WebRTC原生视频采集

在介绍视频设备的采集之前,首先要分析一下WebRTC的DeviceManager结构,因为视频采集的抽象接口VideoCapturer的WebRTC原生实现就是通过它来创建的。这个类的功能还包括枚举音视频设备的相关信息等。结构如下:

限于篇幅,该UML中没有标出DeviceManagerInterface接口的所有功能接口,具体包括:获取音频输入/输出设备列表、获取视频输入设备列表、根据设备信息创建VideoCapturer视频采集对象等。由于获取硬件设备列表,涉及到平台相关的调用,在Windows平台下的实现是Win32DeviceManager类(可以调用DeviceManagerFactory的静态方法Create()返回当前平台相应的DeviceManager对象)。关注一下DeviceWatcher,顾名思义,它的功能在于监控设备的变化。在Windows平台下的实现Win32DeviceWatcher通过API函数RegisterDeviceNotification监控视频类设备和音频类设备的变化。当有监视的类型设备发送变化时,会通过DeviceManagerInterface接口的SignalDevicesChange信号向外投递通知。最后分析一下创建VideoCapturer的流程。DeviceManager创建VideoCapturer对象时通过VideoDeviceCapturerFactory接口来完成的。VideoDeviceCapturerFactory接口的默认实现是WebRtcVideoDeviceCapturerFactory类,该类创建WebRtcVideoCapturer对象做为VideoCapturer接口的实现。可以理解成WebRtcVideoCapturer就是WebRTC原生的视频采集的实现,但这种说法不确切,因为视频采集涉及到跨平台,没这么简单。下面再细扒一下WebRtcVideoCapturer:

由于平台相关性,WebRtcVideoCapturer仍然不是视频采集的真正实现,它创建一个VideoCaptureModule接口对象来完成真正的视频采集工作。该抽象接口是视频采集的实现接口,最终在Windows平台下由VideoCaptureDS(传统的DirectShow方式)和VideoCaptureMF(Vista之后的Media Foundation API实现方式)来实现采集工作。这里要说明一下VideoCaptureMF在WebRTC中还是个空架子,还未真正实现,如果读者对Media Foundation API实现视频采集感兴趣,可以参考Chromium的media库中VideoCaptureDeviceMFWin类实现。

接下来分析一下VideoSourceInterface和VideoCapturer是如何结合,以及采集由谁驱动开始的。

VideoSource是WebRTC对VideoSourceInterface接口的实现, 它容纳一个VideoCapturer对象做为视频采集源,VideoRenderer是供外部从VideoSource中获取视频帧数据。此外VideoSource还依赖ChannelManager对象,使用它所包含的CaptureManager来负责视频的采集任务。VideoSource在创建的时候就会调用 Initialize方法中调用ChannelManager的StartVideoCapture方法开始采集视频数据。CaptureManager内部为每个VideoCapturer对象维护了一个CaptureRenderAdapter,CaptureRenderAdapter在创建的时候将OnVideoFrame成员方法挂接上VideoCapturer的SignalVideoFrame信号来实时接收采集源传送过来的视频帧数据,OnVideoFrame内部将接收到的视频帧数据分发给向其注册的VideoRenderer对象(VideoRenderer对象的注册的流程是VideoSource到ChannelManager,再到CaptureManager,最后注册到CaptureRenderAdapter与特定的VideoCapturer关联)。

至此,VideoSourceInterface在WebRTC中的实现已经很清晰了,视频采集的流程和时机也很明了,接下来顺便稍等地简单分析一下WebRTC中VideoTrackInterface接口的实现:

WebRTC创建了一个VideoTrack实现VideoTrackInterface接口,在此之前我一直有个疑问,VideoTrackInterface对外暴露的视频输出接口是VideoRendererInterface,而视频源接口VideoSourceInterface对外暴露的视频输出接口是VideoRenderer,两套接口是如何适配的。看到这里,我发现原来VideoTrack新建了一个VideoTrackRenderers对象来完成VideoRendererInterface接口到VideoRenderer接口的适配工作。VideoTrackRenderers一方面从VideoRenderer接口派生,这样就可以将自己通过VideoSourceInterface的AddSink方法挂接进去来接收视频帧数据,另一方面将接收到的视频帧数据分发给外部挂接给VideoTrackInterface的VideoRendererInterface接口。

2. Chromium对WebRTC的视频采集适配

Chromium创建WebRtcVideoCapturerAdapter类来实现VideoCapturer接口,相关结构如下:

Chromium自己也封装了Track、Source概念,所以当初看这块的时候脑袋不容易转弯费了不少心思。WebRtcVideoCapturerAdapter需要接收Chromium的视频采集模块传输过来的帧数据,通过一层层的挂接,最终挂接到MediaStreamVideoSource类中。MediaStreamVideoSource接收到视频帧数据时,再一层层地通知回来,最终通知到WebRtcVideoCapturerAdapter的OnFrameCaptured方法,该方法内部触发SignalFrameCaptured信号。

MediaStreamVideoSource封装了Chromium视频采集的入口,这块结构就复杂了,牵涉到跨进程的架构,如下:

这部分不打算细说,如果细说就很可能混淆到目前为止建立的仅有的一点点概念了,本节主要是介绍的是Chromium对WebRTC视频采集接口的定制。

WebRTC手记之框架与接口

Tags

转载请注明出处:http://www.cnblogs.com/fangkm/p/4370492.html

上一篇文章简单地介绍了下WebRTC的协议流程,这一篇就开始介绍框架与接口。

一提到框架,本能地不知道从什么地方入手了。曾经直接从Chromium项目对WebRTC的源码的集成方面入手,后来发现这个步子迈的太大了,看的越多,概念越混乱,看了半个月感觉也没啥沉淀。还是从WebRTC提供的示例工程peerconnection_client入手比较轻便。先抛开音视频流的构建和渲染流程,示例工程核心的代码结构如下:

从面向对象的视角来看,WebRTC的设计还是非常棒的,真正地做到了接口编程的概念,对WebRTC功能的使用都通过接口来进行,这样最大程度上保证了WebRTC模块的可定制性,这样就可以让WebRTC更多地回归到描述协议的本质。如果WebRTC对这些接口的实现不能满足你的业务需求,理论上你可以提供自己的实现逻辑。本图中的PeerConnectionFactoryInterface和PeerConnectionInterface没有这种定制的代表性,因为重新提供它们的实现逻辑的需求场景基本上不存在(即便不用重写,但也支持参数的定制,具体请参见CreatePeerConnectionFactory的重载方法)。但是音视频相关的接口定制的场景就很普遍了,比如Chromium浏览器集成WebRTC,但是音视频采集需要走Chromium自己的音视频模块,所以Chromium对WebRTC音视频的采集接口重新做了实现适配,以后有机会肯定非常乐意分享下Chromium源码对WebRTC的集成,不过那也是在对WebRTC熟悉完之后的工作了。

图中Conductor是该示例工程提供的核心业务类,整个WebRTC的使用都浓缩在这个类中。Conductor通过CreatePeerConnectionFactory方法创建了一个PeerConnectionFactoryInterface接口的实现对象,通过这个接口,可以创建关键的PeerConnectionInterface接口,PeerConnectionInterface接口是WebRTC的协议核心。此外,PeerConnectionFactoryInterface接口还提供了创建本地音视频流的功能接口,这个部分稍后再述。根据图中PeerConnectionInterface接口的成员方法可以看出,WebRTC通信流程的交互接口基本上都在这里面了,给Conductor的回调通知是通过PeerConnectionObserver接口来完成。具体的交互流程请参见上一篇博文。

接下来分析本地音视频的相关接口,由于音视频内容较多,这里先介绍下接口概念,不谈具体实现(下一节专门讲解WebRTC原生的音视频采集),还是以peerconnection_client工程为例:

这里涉及到非常多的音视频相关接口,基本上都是概念性的,最怕遇到新的设计概念,主要是怕自己理解有误差,下面谈一下我对这些接口概念的理解:

MediaStream概念: 表示媒体流,由MediaStreamInterface接口抽象,每个媒体流都有一个唯一的标识(通过label成员方法返回),它由一系列的音频Track(由AudioTrackInterface接口抽象)和视频Track组成(由VideoTrackInterface接口抽象)。

Track概念:具体指上图结构中AudioTrackInterface和VideoTrackInterface接口,Track表示的是在媒体流中轨的概念,AudioTrackInterface标识的是音频轨,VideoTrackInterface标识的是视频轨,一个MediaStreamInterface标识的媒体流中允许携带多个媒体轨数据,它们之间是独立的,在编码渲染的流程中各自处理。如果概念还很模糊,轨的概念就相当于音频数据中的声道概念(左声道、右声道)、视频数据中的YUV场的概念。Track既然封装了媒体轨数据,那就必然有个媒体源做为数据的提供者,如音频Track由AudioSourceInterface接口作为数据源提供者,视频Track由VideoSourceInterface接口作为数据的提供者。有输入接口就必然有输出接口,这部分在该图中只展示了视频数据的输出接口VideoRendererInterface,这里的Render命名的意思并不是仅限于将视频和音频数据渲染出来,应该理解成输出接口。

VideoSourceInterface:抽象视频源接口供VideoTracks使用,同一个源可以被多个VideoTracks共用。视频源接纳了一个VideoCapturer接口,抽象视频采集的逻辑,我们可以提供自己的VideoCapturer实现做为视频数据的采集源。VideoCapturer是个关键的定制接口,比如Chromium源码就是自己实现了VideoCapturer接口而没用原生的WebRTC采集实现,但Chromium的音视频采集都在browser进程,因此它对VideoCapturer接口的实现要比想象的复杂,它需要从主进程接收到视频帧数据然后触发VideoCapturer的SignalFrameCaptured信号。

AudioSourceInterface:概念上同VideoSourceInterface类似,抽象音频源接口供AudioTracks使用,但是从源码中理解,这是个伪概念,因为没有提供一个类似于VideoCapturer的AudioCapturer接口,这里没有音频的采集逻辑,实际上WebRTC的音频采集接口使用的是AudioDeviceModule,在创建PeerConnectionFactory的时候可以由外界定制,如果没有,则内部创建AudioDeviceModuleImpl来实现此接口完成音频设备的采集工作。可能是功力不够,反正我是不太理解音频采集和视频采集这种设计的不对称性。如果也封装一个AudioCapturer接口的概念,这样可定制性是不是可以更高。

构建媒体流的过程基本上就是构建Video Track和Audio Track,并将其添加到Media Stream里。在peerconnection_client工程中,Conductor依赖DeviceManagerInterface接口的CreateVideoCapturer方法创建一个当前可用的视频设备采集对象VideoCapturer,将它作为视频采集源中的数据来源(通过挂接VideoCapturer的SignalVideoFrame信号来接收视频数据),此外MainWnd还创建了一个内部类VideoRenderer从VideoRendererInterface接口派生,并将其添加到Video Track中, VideoRenderer的实现就是将接收到的视频帧数据渲染到窗口上。

下一篇开始分析WebRTC原生的音视频本地采集模块。

WebRTC手记之初探

Tags

转载请注明出处:http://www.cnblogs.com/fangkm/p/4364553.html 

WebRTC是HTML5支持的重要特性之一,有了它,不再需要借助音视频相关的客户端,直接通过浏览器的Web页面就可以实现音视频对聊功能。而且WebRTC项目是开源的,我们可以借助WebRTC源码快速构建自己的音视频对聊功能。无论是使用前端JS的WebRTC API接口,还是在WebRTC源码上构建自己的对聊框架,都需要遵循以下执行流程:

上述序列中,WebRTC并不提供Stun服务器和Signal服务器,服务器端需要自己实现。Stun服务器可以用google提供的实现stun协议的测试服务器(stun:stun.l.google.com:19302),Signal服务器则完全需要自己实现了,它需要在ClientA和ClientB之间传送彼此的SDP信息和candidate信息,ClientA和ClientB通过这些信息建立P2P连接来传送音视频数据。由于网络环境的复杂性,并不是所有的客户端之间都能够建立P2P连接,这种情况下就需要有个relay服务器做音视频数据的中转,本文本着源码剖析的态度,这种情况就不考虑了。这里说明一下, stun/turn、relay服务器的实现在WebRTC源码中都有示例,真是个名副其实的大宝库。

上述序列中,标注的场景是ClientA向ClientB发起对聊请求,调用描述如下:

  • ClientA首先创建PeerConnection对象,然后打开本地音视频设备,将音视频数据封装成MediaStream添加到PeerConnection中。
  • ClientA调用PeerConnection的CreateOffer方法创建一个用于offer的SDP对象,SDP对象中保存当前音视频的相关参数。ClientA通过PeerConnection的SetLocalDescription方法将该SDP对象保存起来,并通过Signal服务器发送给ClientB。
  • ClientB接收到ClientA发送过的offer SDP对象,通过PeerConnection的SetRemoteDescription方法将其保存起来,并调用PeerConnection的CreateAnswer方法创建一个应答的SDP对象,通过PeerConnection的SetLocalDescription的方法保存该应答SDP对象并将它通过Signal服务器发送给ClientA。
  • ClientA接收到ClientB发送过来的应答SDP对象,将其通过PeerConnection的SetRemoteDescription方法保存起来。
  • 在SDP信息的offer/answer流程中,ClientA和ClientB已经根据SDP信息创建好相应的音频Channel和视频Channel并开启Candidate数据的收集,Candidate数据可以简单地理解成Client端的IP地址信息(本地IP地址、公网IP地址、Relay服务端分配的地址)。
  • 当ClientA收集到Candidate信息后,PeerConnection会通过OnIceCandidate接口给ClientA发送通知,ClientA将收到的Candidate信息通过Signal服务器发送给ClientB,ClientB通过PeerConnection的AddIceCandidate方法保存起来。同样的操作ClientB对ClientA再来一次。
  • 这样ClientA和ClientB就已经建立了音视频传输的P2P通道,ClientB接收到ClientA传送过来的音视频流,会通过PeerConnection的OnAddStream回调接口返回一个标识ClientA端音视频流的MediaStream对象,在ClientB端渲染出来即可。同样操作也适应ClientB到ClientA的音视频流的传输。

这里的流程仅仅是从使用层面上描述了一下,具体内部都做了什么、怎么做的,以后的文章中会慢慢细扒,万事开头难,自我鼓励一下。

Redis vs. MongoDB Performance

Src:http://www.badrit.com/blog/2013/11/18/redis-vs-mongodb-performance#.VY2-qROqpBc

MongoDB is an open source document database, and the leading NoSQL database which is written in C++ and Redis is also an open source NoSQL database but it is key-value store rather than document database. Redis is often referred to as a data structure server since keys can contain strings, hashes, lists, sets and sorted sets.

Here’s a simple benchmark in node.js to compare the performance between Redis and MongoDB. The benchmark compares the time of writing and reading for both. For Redis I used node.js Redis client and for MongoDB I used node.js MongoDB driver

And here’s the code

In case of redis:

var redis = require("redis") 
,	client = redis.createClient() 
,	numberOfElements = 50000; 

client.del({},function(err,reply){ 
	redisWrite(); 
}); 

function redisWrite () { 
 console.time('redisWrite'); 
   for (var i = 0; i < numberOfElements; i++) { 
	 client.set(i, "some fantastic value " + i,function(err,data){ 
	   if (--i === 0) { 
	       console.timeEnd('redisWrite'); 
	       redisRead(); 
	       } 
	 }); 
   }; 
} 

function redisRead(){ 
 client = redis.createClient(); 
 console.time('redisRead'); 
 for (var i = 0; i < numberOfElements; i++) { 
       client.get(i, function (err, reply) { 
         if (--i === 0) { 
	     console.timeEnd('redisRead'); 
	     } 
       }); 
 } 
}

In case of MongoDB:

var MongoClient = require('mongodb').MongoClient 
, numberOfElements=50000;    

MongoClient.connect('mongodb://127.0.0.1:27017/test', function(err, db) { 
   var collection = db.collection('benchmark'); 
   collection.ensureIndex({id:1},{} ,console.log); 
   collection.remove({}, function(err) { // to remove any element from the database at first 
   mongoWrite(collection,db); 
   }); 
}) 

function mongoWrite(collection,db){ 
  console.time('mongoWrite'); 
  for (var i = 0; i < numberOfElements; i++) { 
        collection.insert({id:i,value:"some fantastic value " + i}, function(err, docs) { 
          if(--i==0){ 
             console.timeEnd('mongoWrite'); 
             mongoRead(collection,db); 
          }      
        }); 
  }; 
} 


function mongoRead(collection,db){ 
 console.time('mongoRead'); 
 for (var i = 0; i < numberOfElements; i++) { 
       collection.findOne({id:i},function(err, results) { 
         if(--i==0){ 
            console.timeEnd('mongoRead'); 
            db.close(); 
            } 
       }); 
 } 
}

Results were measured using MongoDB 2.4.8 and Redis 2.6.16

Machine Specifications

  • Processor : 4x Intel(R) Core(TM) i5-3230M CPU @ 2.60GHz
  • Memory : 3892MB
  • Operating System : Ubuntu 13.04
  • Kernel -Version : Linux 3.8.0-33-generic (x86_64)
Redis Read Mongo Read Redis Write Mongo Write
10 2 5 5 8
100 13 11 8 34
1,000 38 93 31 153
10,000 238 980 220 1394
50,000 958 5218 979 8713

Calculated time in milliseconds (lower is better)


Form results we can see that both Mongo and Redis have almost equal time in case of small number of entries but when this number increases, Redis has remarkable superiority over mongo.

The results will vary according to your programming language and also according to the specifications of your machine.

Installing Tomcat 8 on OS X 10.10 Yosemite

The Servlet 4.0 specification is out and Tomcat 9.0.x will support it. However, at this point Tomcat 8.0.x is the best Tomcat version and it is supporting the 3.1 Servlet Spec.

Since OS X 10.7 Java is not (pre-)installed anymore, let’s fix that first.

Prerequisite: Java

As I’m writing this, Java 8u45 is the latest version, available for download here: http://www.oracle.com/technetwork/java/javase/downloads/jdk8-downloads-2133151.html

The JDK installer package come in an dmg and installs easily on the Mac; and after opening the Terminal app again,

java -version

now shows something like this:

java version "1.8.0_45"
Java(TM) SE Runtime Environment (build 1.8.0_45-b14)
Java HotSpot(TM) 64-Bit Server VM (build 25.45-b02, mixed mode)

Whatever you do, when opening Terminal and running java -version, you should see something like this, with a version of at least 1.7.x I.e. Tomcat 8.x requires Java 7 or later.

sudo is a program for Unix-like operating systems, allowing you to run programs with the security privileges of another user (normally the superuser, or root). Since we are creating directories, outside of your home folder, administrator right are required. I.e., when executing sudo you will be asked to enter your password; and your Mac User account needs to be an ‘Admin’ account.

JAVA_HOME is an important environment variable, not just for Tomcat, and it’s important to get it right. Here is a trick that allows me to keep the environment variable current, even after a Java Update was installed. In ~/.bash_profile, I set the variable like so:

export JAVA_HOME=$(/usr/libexec/java_home)

Installing Tomcat

Here are the easy to follow steps to get it up and running on your Mac

  1. Download a binary distribution of the core module: apache-tomcat-8.0.22.tar.gz from here. I picked the tar.gz in Binary Distributions / Core section.
  2. Opening/unarchiving the archive will create a folder structure in your Downloads folder: (btw, this free Unarchiver app is perfect for all kinds of compressed files and superior to the built-in Archive Utility.app)
    ~/Downloads/apache-tomcat-8.0.22
  3. Open to Terminal app to move the unarchived distribution to /usr/local
    sudo mkdir -p /usr/local
    sudo mv ~/Downloads/apache-tomcat-8.0.22 /usr/local
  4. To make it easy to replace this release with future releases, we are going to create a symbolic link that we are going to use when referring to Tomcat (after removing the old link, you might have from installing a previous version):
    sudo rm -f /Library/Tomcat
    sudo ln -s /usr/local/apache-tomcat-8.0.22 /Library/Tomcat
  5. Change ownership of the /Library/Tomcat folder hierarchy:
    sudo chown -R <your_username> /Library/Tomcat
  6. Make all scripts executable:
    sudo chmod +x /Library/Tomcat/bin/*.sh

Tomcat 8.x

Instead of using the start and stop scripts, like so:

47 wolf:~$ /Library/Tomcat/bin/startup.sh
Using CATALINA_BASE: /Library/Tomcat
Using CATALINA_HOME: /Library/Tomcat
Using CATALINA_TMPDIR: /Library/Tomcat/temp
Using JRE_HOME: /Library/Java/JavaVirtualMachines/jdk1.8.0_45.jdk/Contents/Home
Using CLASSPATH: /Library/Tomcat/bin/bootstrap.jar:/Library/Tomcat/bin/tomcat-juli.jar
Tomcat started.
48 wolf:~$ /Library/Tomcat/bin/shutdown.sh
Using CATALINA_BASE: /Library/Tomcat
Using CATALINA_HOME: /Library/Tomcat
Using CATALINA_TMPDIR: /Library/Tomcat/temp
Using JRE_HOME: /Library/Java/JavaVirtualMachines/jdk1.8.0_45.jdk/Contents/Home
Using CLASSPATH: /Library/Tomcat/bin/bootstrap.jar:/Library/Tomcat/bin/tomcat-juli.jar
49 wolf:~$

you may also want to check out Activata’s Tomcat Controller, a tiny freeware app, providing a UI to quickly start/stop Tomcat. It may not say so, but Tomcat Controller works on OS X 10.10 just fine.

Finally, after your started Tomcat, open your Mac’s Web browser and take a look at the default page: http://localhost:8080

Reference: https://wolfpaulus.com/jounal/mac/tomcat8/

MySQL – Connect to your database remotely

This tutorial will walk you through setting up a user on your MySQL server to connect remotely.

The following items are assumed:

  • You have access to login as the ‘root’ MySQL user

Contents

Getting your IP address

You will need to know what the IP address you are connecting from. To find this you can go to one of the following sites:

Granting Access

Granting access to a user from a remote host is fairly simple and can be accomplished from just a few steps. First you will need to login to your MySQL server as the root user. You can do this by typing the following command:

# mysql -u root -p

This will prompt you for your MySQL root password.

Once you are logged into MySQL you need to issue the GRANT command that will enable access for your remote user. In this example we will be creating a brand new user (fooUser) that will have full access to the fooDatabase database.

Keep in mind that this statement is not complete and will need some items changed. Please change 1.2.3.4 to the IP address that we obtained above. You will also need to change my_password with the password that you would like to use for fooUser.

mysql> GRANT ALL ON fooDatabase.* TO fooUser@'1.2.3.4' IDENTIFIED BY 'my_password';

This statement will grant ALL permissions to the newly created user fooUser with a password of ‘my_password’ when they connect from the IP address 1.2.3.4.

Testing Remotely

Now you can test your connection remotely. You can access your MySQL server from another Linux server:

# mysql -u fooUser -p -h 44.55.66.77
Enter password: 
Welcome to the MySQL monitor.  Commands end with ; or \g.
Your MySQL connection id is 17
Server version: 5.0.45 Source distribution

Type 'help;' or '\h' for help. Type '\c' to clear the buffer.

mysql> _

Note that the IP of our MySQL server is 44.55.66.77 in this example.

Notes

There are a few things to note when setting up these remote users:

  • When setting up users a local user is not the same thing as a remote user. For instance fooUser@localhost is not the same as fooUser@1.2.3.4. You will have to duplicate permissions if you want them to have the same permissions.
  • Granting ALL permissions is not advised. Using GRANT SELECT,INSERT,UPDATE,DELETE is a wise alternative for a normal user.
  • If you would like to grant only to a specific table you can use database.table instead of database.*. In respect to our example above you could put fooDatabase.fooTable.
  • If you are using iptables you will need to make an entry in your firewall for TCP port 3306. When creating your firewall rule you can simply use the name ‘mysql’ for the port number. Search our wiki for iptables and you will find a list of common rule sets which include an entry for MySQL.

Reference:

https://www.rackspace.com/knowledge_center/article/mysql-connect-to-your-database-remotely

http://www.cyberciti.biz/tips/how-do-i-enable-remote-access-to-mysql-database-server.html

Javascript for Geospatial and Advanced Maps

Tags

, ,

Source: http://codepen.io/stevepepple/blog/javascript-geospatial-examples

A look at the latest web tools for geospatial analysis and advanced maps by@stevepepple

In the past year, a wealth of new web tools have emerged to help with web-based GIS and spatial analysis.

While Google, ArcGIS, and Nokia have long provided APIs for maps with analysis feature, they can be expensive, onerous to learn, and lock the map developer to a single map solution.

There are now a number of useful and modular Javascript libraries for doing GIS, spatial statistics, and cartography.

Many of the tools I’ll discussed our built in cooperation with Mapbox, Cloud Made, and MapZen. However, I specifically want to discuss simple tools for specific goals, not products or platforms. A fantastic new library, Turf.js (by MapBox), covers many of these topics, but there are plenty of other libraries that provide the same features and more. These tools can be added as packages to Node.js or used for analysis in a web browser. Data visualization libraries like D3.js and Processing are invaluable for displaying and interacting with the results of these GIS function. I also could write a long post about all the cool libraries for cartography and map presentation with Leafet.js.

With all this said, here’s a list of GIS functionality and examples:

3D & Geometry

Three.js is a Javascript library for geometric and mesh object. Three GeoJSON provides a simple way to render GeoJSON objects on 3D planes and spheres. Here’s an example:

Sylvester is a library for geometry, vector, and matrix math in Javascript.

The OSM Buildings project allows the map designer to represent buildings as 3D objects on a 2D map. The project uses OpenLayers and Leaflet. Here is an example by Tom Holderness who used OSM Buildings to map London.

Example of OSM Buildings

Distance and Measurement

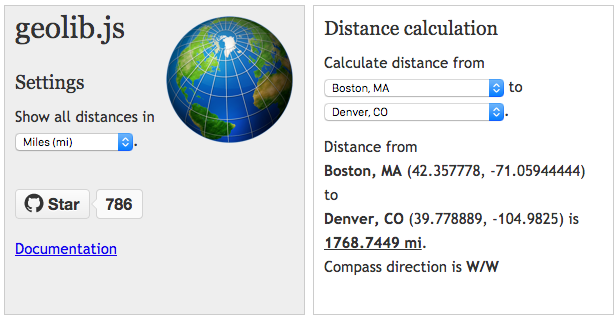
Geolib provide distance (and estimated time) calculation between two latitude-latitude coordinates. A handy feature of Geolib is orderByDistance, which sorts a list/array by distance. The library supports elevation as well.

Example-of-geolib

Turf.js provides a distance function to calculate the great-circle distance betwen points. It also calculates area, distance along a path, and midpoint between points.

Geo Features

Leaflet is simply the best option for working with the display of points, symbols, and all types of features on web and mobile devices. The library supports rectangles, circles, polygons, points, custom markers, and a wide variety of layers. It performs quickly, handles a variety of formats, and makes styling of map features easy.

Turf.js is a library from Mapbox for geospatial analysis. One of the great features of Turf is that you can create a collection of features and then spatial analyze, modify (geoprocess), and simply it before using Leaflet to present the data. Here’s an example of Leaflet and Turf in action:

Geolib and Turf both calculate the path length, feature center, points inside a feature

Simple Map D3 creates choropleths and other symbology by simply defining a geojson object and data attribute.

There’s a plugin for Leaflet.js for geocoding called Geo Search that allows the developer to choose between the ArcGIS, Google, and OpenStreetMaps geocoder.

Felipe Oliveira’s Geo for Node.js is a geocoding library that uses Google’s Geocode API for geocoding and reverse geocoding. And it supports GeoHash.

Turf.js has a filter funciton, which can be used to find a feature (by attribute) that matches a name or value.

Geofencing and GPS

The HTML5 Geolocation API provides a simple method getting a devices location (with user permission). Using this coordiante there are a number of libraries for calculating if this coordinate is inside a circle or other shape. Here’s an example by Jim Ing that pulls the elements together:

Geoprocessing

Turf.js provides tools for clipping data, merging data, disolving data, and returning intersection or union of two data sets. The library also can manipulate and invert features. Turf even uses Vladimir Agafonkin’s Simply.js to perform polyline simplification.

Ben Southgate’ d3.geo.exploder allows to transition geographic features (geoJSON) to another shape, like a grid or a scatter plot.d3.geo.exploder

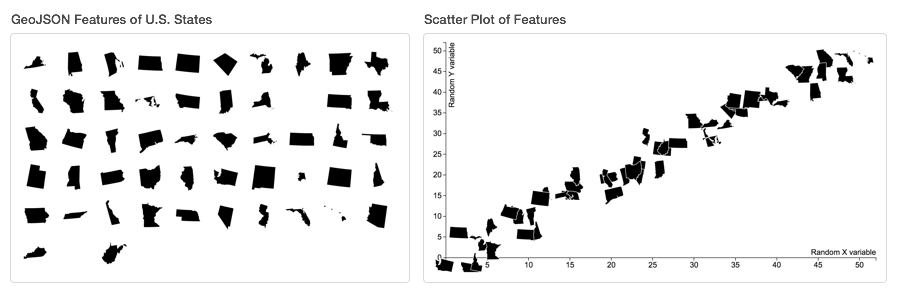
(There are many other geo utilties that I link to at the end of this article.)

Heat maps

I’ve already praised Leaflet, but also wanted to show an example of the Leaflet Heat Map plugin.

Network Analysis

Mike Dewars’ book on D3.js, Getting Started with D3, include a number of examples of using D3 with maps and spatial analysis. One of the more interesting examples is creating a directed graph of the New York Metro, which is done by analyzing the Google Transit specification for MTA with NetworkX.

The next example of geo points take the output of network analysis and visualized it on a geographic map. In this case I used Felix Kling’s Javascript port of NetworkX to calculate the centrality and degree of each transit stop in the network.

Points

Turf.js provides a number of different operations for points, including finding the centroid point in a feature and creating a rectangle or polygon that encompases all points. Turf provides many statistics for a collection of point, such as the average based on value of each point. Turf also provides some excellent spatial analysis funcitons for points, which I’ll in the last section..

Leaflet.js is great for visualizing the results from Turf or a collection of points that is large. The library itself handles hundreds of points and there are plugins like Marker Cluster and Mask Canvas for handling hundreds of thousands of points.

Here’s an example of display a few hundred points using leaflet:

Routing

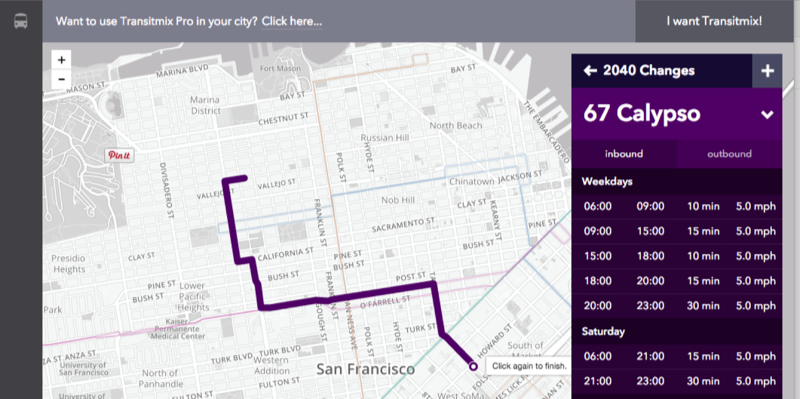
As with Geocoding, there are a myriad routing services, but they will cost you. The Open Source Routing Machine (OSRM) Instance by MapZen provides a free service for routing car, bicycle, and pedestrian direction. Transit Mix cleverly uses the OSRM Routing tool for creating routes in their excellent transportation planning tool.

Example of Transit Mix using OSRM routing

Spatial Analysis

Turf.js provide a number of spatial analysis functions including buffers, classification, interpolation, Triangulated irregular networks (TINs). One really nice feature is the ability to spatial join data using Turf tag.

I’m excited to see Turf and other library continue to produce exploratory analysis tools for kernel density, spatial distribution, elevation, path selection, viewsheds, and so forth.

Here’s an example of using Turf.js to try out spatial analysis on tens of thousands of Points of Interest in the Los Angeles area:

Utilities

  • Polymaps is a Javascript library for dynamic, interactive maps. It uses SVG and can be easily styled with CSS
  • CartoDB is an open source tool that allows for the storage and visualization of geospatial data on the web
  • shp conversa Shapefile (and dbf?) to GeoJSON.
  • TopoJSON format
  • ToGeoJSON (https://github.com/mapbox/togeojson) converts KML & GPX to GeoJSON, in a browser or with nodejs.
  • Mapstraction is a service that acts as a common API between ArcGIS, Google, Leaflet, Nokia, CloudMade, and several other making services.
  • Doug McCune’s shp2stl converts geo data into 3D models that can be rendered or 3D printed.
  • MetaCRS and Proj4js convert between coordinate systems
  • Geo5 for geo-related HTML5 documents, including offline maps for mobile applications. http://geo5.org/#intro